

[ENGN3213 Home]
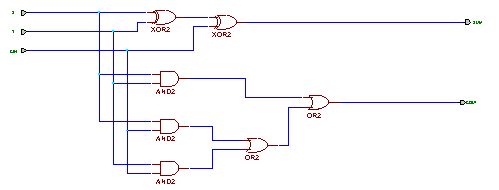
Open the Schematic Editor, and enter the full adder circuit
of Figure 13. The inputs are
X, Y, CIN, and the outputs are SUM, COUT
(see also Wakerly, Fig. 5-86, page 431).
Figure 13:
Full adder adder4-s1.sch.
 |
To do this, you will need to use the editor in appropriate modes, making use
of various tools, Figure 14:
- 1.
- Select and Drag
- 2.
- Hierachy Push/Pop
- 3.
- Symbols toolbox
- 4.
- Draw wires
- 5.
- Draw buses
- 6.
- Draw bus taps
- 7.
- Add net or bus name
- 8.
- Hierachy connector
- 9.
- Graphics toolbox
You can use the menu accessed via the right mouse button to change modes.
Figure 14:
Schematic Editor tool buttons.
 |
- 1.
- Enter your name and student number in the title block.
- 2.
- Use the Symbols toolbox to place the parts, Figure
15.
- 3.
- Use the Draw wires mode to wire the parts together.
- 4.
- The inputs and outputs are termined with
Hierachy Connectors.
They can be added by using the Hierachy connector mode,
or when drawing the wire, using the right mouse button menu option
Add terminal...
These should be labeled, and their directions correctly indicted.
- 5.
- Save the file as adder-s1.sch.
- 6.
- Add the sheet to the Project
Hierachy  Add Sheet to project
- 7.
- Create the Netlist
Options  Create netlist
Figure 15:
Schematic Editor Symbols toolbox.
 |
The IBUF and OBUF parts are not used here, since this full adder circuit
will become a module in the larger design.
The Hierachy Connectors are used to communicate between levels in a
hierachical design.


[ENGN3213 Home]
ANU Engineering - ENGN3213

Add Sheet to project
Create netlist