We have been using O.S.
glow engines. In my experience, a 65AX
provides enough thrust, but a 75AX
gives you that extra bit of oomph (unlimited vertical climbing
with a 14x6 prop). One club member has put in a 95AX
(!). But even with the 65AX or the 75AX the Taipan is a rather
fast plane. Regarding electric motors see Alistair's Setup below.
About weight: my Taipan weighs 3.9 Kg, which feels rather heavy.
Indeed, VQ specify a weight of 3.2-3.4 Kg. With the 75AX, I needed
additional weight on the tail. Also, the E-Flite
retracts I used add 230g to the total weight. VQ offers
electrical retracts that seem to be lighter. Savings on weight
make the 65AX a viable option, or possibly also the 55AX.
Indeed, Gowrie has flown a Taipan with an OS 55AX. A lower-powered
but light set up that requires nose weight. It flies well, though
understandably will not pull an up-line with the authority of an
65AX or 75AX and might only complete a comparatively tight
downwind loop. Still, a fine combo, especially if flown in lighter
winds.
On earlier Taipans, VQ have marked incorrectly the thrustline on
the engine side of the firewall. While it is correct in the
vertical direction, the correct correct thrustline is 19mm
downwards of the marked position. VQ models has been
informed about this problem and it seems they have fixed it.
Anyway, the correct horizontal thrustline is about 2mm below the
hole for the fuel tubing.
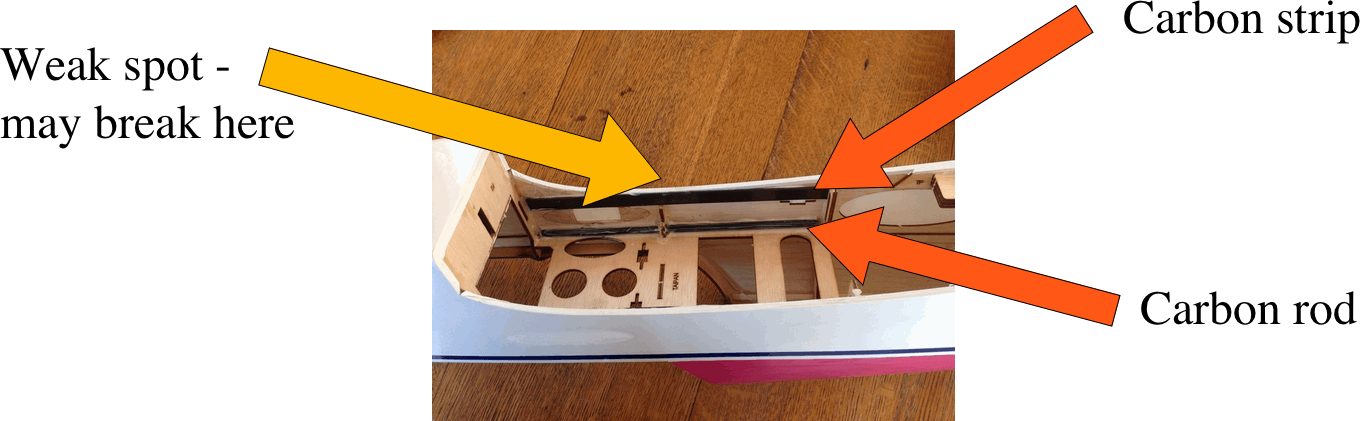
The Taipan fuselage has a weak spot, as indicated in the picture
below. The height of the fuselage that separates the front part
from the back part of the fuselage is just 6cm at its narrowest
point. The fuselage can break exactly there in flight even under
moderate stress only. That's what happened to mine. I fixed it by
gluing plywood doublers in place across the whole length of the
wing area. Gowrie Waterhouse proposed a possibly better solution
by reinforcement with carbon strips and carbon rods, as indicated,
glued in place with 30 minutes epoxy.
In order to align the landing gear with the leading edge of the
wing add a doubler of about 5mm below the rearward mount of the
landing gear. This improves ground handling and avoids nose-overs.
 Detail:
  Elevator and Rudder Servos Placement
The Taipan offers the option of installing the rudder servo in
the tail or (with a pull-pull configuration) in the main
compartment along with the throttle servo. Most Taipan
configurations will need some additional tail weight anyway, which
suggests the former configuration. The following images show my
servos installation in more detail. The linkages and rods are
setup in such a way that the same throw on both elevators result.


Pilots should watch out for unanticipated high speed stalls if the elevator throws are high and up-stick is pulled reasonably hard.
Engine: O.S. 75AX, which weighs about 750g incl. muffler.
Propeller: APC 14x6
Weight (dry): 3.9Kg
Balancing: The following table shows the weights I added:
| Lateral balance |
25g on tip of left wing, to
compensate for the cylinder/muffler weight on the right
side of the plane (I think...) |
| Center of Gravity |
100g on tail. This puts the center of gravity
5mm rearwards of the recommended value. (10mm would be fine
as well.) |
Thrust line adjustment: 19mm down from indicated line
Retracts: E-Flite 60 - 120 90-Degree Main Electric Retracts [EFLG400]
Throws:
Low Rates
High Rates
Elevator
13mm up/down
20mm up/down
Rudder
60mm left/right
70mm left/right
Aileron
10mm up / 8mm down
12mm up / 10mm down
Throws are measured at the widest point of deflection. Notice the different aileron up/down throws, which are achieved by 15% differential. This seems to help rolls being more axial. The aileron low rate setting results in three rolls in five seconds on full aileron deflection.
Rudder mixing. Unlike the Ultrasport, the Taipan wing has no dihedral. This leads to undesirable flight behavior: on rudder input, the Taipan will nose-dive and roll adversely. Some are suggesting to build the wing with dihedral, see the discussion in this thread on rcgroups.com. Indeed, this might be the proper fix. With a wing without (zero) dihedral I am using the following mixes:
| Left rudder to ... |
... elevator: 25% up |
... aileron: 20% proverse |
| Right rudder to ... |
... elevator: 35% up |
... aileron: 25% proverse |
Notice the asymmetric setup. The values shown enable knife-edge flight without aileron or elevator corrections with my Taipan.
Building tip: I used a hot glue gun to connect the wing shield to the wing, after stripping off the covering at the contact area. Additionally I secured the wing shield in place with a couple of screws. The screws are essential. The manual says to use CA (see page 11). I doubt this provides a reliable connection.
Engine: O.S. 75AX
Weight (dry): 3.5Kg
Balancing: Tail weight added: 30g; 30g on wing tip of left wing to achieve lateral balance. Lateral balancing is essential, otherwise expect, e.g., corkscrewing loops.
Thrust line adjustment: 13mm down from indicated line.
Servos: Ail = HS 422, Elev = HS 82MG, Rud = HS 635HB (mounted at tail with pushrod setup).
Retracts: Spring Air 301
Other: Carbon push rods. Carbon fuselage reinforcing (as already shown). Elevator servos vertically aligned with each other with respect to the fuselage (done by lowering RH servo opening hole in fuselage). 4mm spacers under rear of retracts. Battery tray to permit battery ~80mm aft of the back of the canopy opening.
Building tip: If using the supplied spinner, add an additional 2.5-3.0mm to the firewall to engine thrust washer distance shown in manual. This ensures easier fitting of the cowl.
Motor: Hyperion Zs4025-14, 416g, Kv=370 (The OS 5025-375 is very similar and if I had the choice of both side by side, I'd choose the OS)
ESC: Castle Edge Lite 100A
The same motor but different batteries and props for 3 distinct power systems, as follows.
System 1. Battery 2 x 4S 4000 for 8s 4000 mAh, prop 14x10 APC E, for about 1350W. This gets about 7 minutes duration, flat out about 3 or 4 minutes. Flies pretty much like a .75 glow, with great speed and verticals.
System 2, same 14x10 prop but 6S. This is only about 800W, which is what VQ recommends for an electric setup. It flew OK, but definitely lacks strength in the vertical and needed full throttle most of the time. Not a recommended solution - if using 6S, one would want Kv approx 500-600. The OS 5020-490 on 6S with a 15x10 prop would be a good lighter weight solution (I run my silver Ki-84 Hayate on that motor and battery with a 14x10). The Elite Power 60B (Kv=470) would also be a good 6S motor.
System 3. 6S, but with a 16x12. This is very similar to the setup I run in my Wind S 50e. The only problem is there is very limited prop clearance with the 16" prop. Performance is very good - only a fraction short of the 8S setup.
System 3 is what I'm flying at present because I have lots of 6S and only one pair of 4S. But for the challenge I think I'll go back to 8S as the packs are newer and I have more options to tweak prop diameter and pitch.
Airframe details: I am using HS-82MG on the ailerons and the two elevator halves. HS-5485HB or a Spektrum DS-821 mounted in the tail. I was aware of the nose heavy tendency, so I went straight for tail mounted servos, my ESC is mounted under the aft end of the battery tray, and I use a 40g Scorpion backup guard battery that I install under the tail about in line with the stab leading edge.
Retracts are the VQ electrics, using the stock fixed gear legs cut to suit. hat required a lot of grinding of the wheel well area to clear the coils in the wires, so if I was doing it again I'd look to use retracts that take a 5mm pin, a simple straight sprung strut. However, the VQ retracts are doing the job well.
Weight with the 8S pack with 56g of lead in the tail to balance is 3.5kg.
"I have built the model with fixed landing gear to help keep the weight down, final AUW will be 3.43 Kg without fuel. Power is supplied by an OS 75 AX that I have had in the shed for a while waiting for a model, I think this will be a bit overpowered, but then that’s what the throttle is for. I added Carbon reinforcing in the form of roving’s epoxied onto the inner sides of the fuselage over the wing as shown below.
Next modification was to add some wheel spats that I had spare, not to improve performance in any way, just to add a bit of difference to the model. I covered over the wheel wells with thin plasticard. The Taipan instructions implied that there was material in the kit to do this, but there wasn’t in my kit. A bit of white iron on film wrapped over the leading edge and over the leading edge of the wheel wells ensures that the airflow will not unstick my wheel well covers."
The Taipan Tips reflects solely our own experiences and
opinions. Yours may be different. Also, the Australian importer is
constantly providing feedback to VQ Models and some of the
building tips here may be obsolete with current or later versions
of the Taipan.
Thanks to Alistair Dally and Gowrie Waterhouse for their
contributions. Thanks to Steve Millar for constructive advice.
Any feedback is appreciated. Please contact Peter
Baumgartner. Email: pbaumgart2@gmail.com
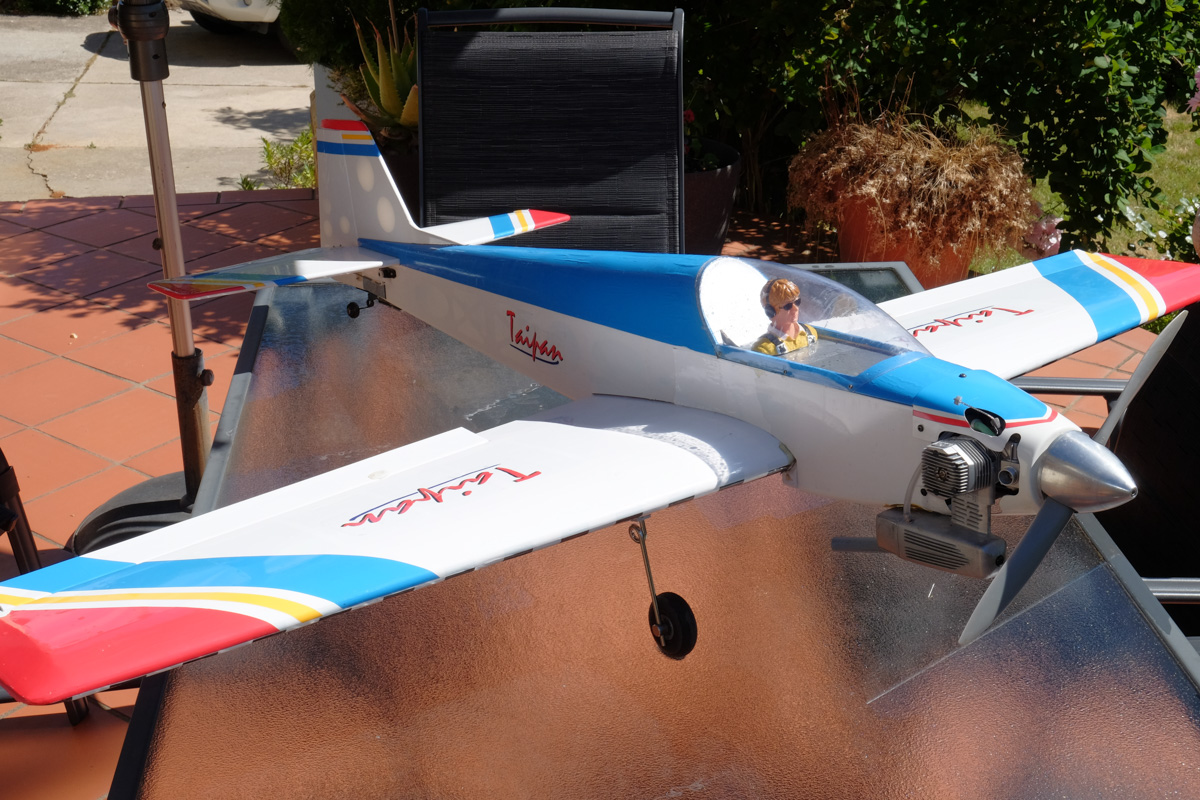
Just two photos of my (heavily used) Taipan for now. Please do
send me yours! Videos are highly solicited.